

How to Set Up an Affiliate Program for WooCommerce (Step by Step)
You spent 400 dollars on ads last month and got eleven sales. That math stings, especially when you pay whether people buy or not.
An affiliate program for WooCommerce flips the deal. Other people promote your products, and you only pay a commission after a sale actually lands.
In this guide, you will set up a complete affiliate program on your WooCommerce store, from plugin installation to your first payout.
Key Takeaways: Affiliate Program for WooCommerce
- A WooCommerce affiliate program lets partners promote your products through tracked links while you pay commissions only on completed sales.
- US affiliate marketing spend was projected to reach nearly 12 billion dollars in 2025, so stores investing in this channel are in good company.
- FluentAffiliate runs your entire program inside WordPress, so you avoid monthly SaaS network fees and per-transaction charges.
- The WooCommerce integration is part of FluentAffiliate Pro, and you can set different commission rates for specific products or categories.
- Branded coupon codes let affiliates earn commissions even when customers never click a link, which is perfect for influencer partnerships.
- Cookie duration, first or last affiliate credit, and self-referral blocking are all configured from one Referral Settings screen.
- Always place a test order through an affiliate link before launch, because a broken tracking setup destroys affiliate trust fast.
What Is a WooCommerce Affiliate Program
A WooCommerce affiliate program is a referral system where partners promote your store using unique tracked links or coupon codes and earn a commission for every sale they generate.
The tracking, commission math, and payout records all run through an affiliate plugin installed on your WordPress site.
This is totally different from ads. With Google or Facebook, you pay for clicks and hope some convert. With affiliates, no sale means no commission and no cost.
Why Your WooCommerce Store Should Run Its Own Affiliate Program
The channel itself is anything but niche. US affiliate marketing spend was projected to reach nearly 12 billion dollars in 2025, an 11.9 percent jump from the year before, and eMarketer expects it to hit 15.8 billion dollars by 2028.
Roughly 81 percent of brands already run affiliate programs according to figures widely attributed to Rakuten. Brands would not keep pouring money into this channel if the return was not there.
You run a WooCommerce store. You already own your platform. WooCommerce powers over 4 million live stores and leads all platforms by store count with roughly a third of the market.
The whole point of self-hosting is control, so keep your affiliate program on your own site too.
Running the program inside WordPress with a plugin like FluentAffiliate means:
- No monthly network fees or per-transaction charges eating your margin
- Your affiliate data lives in your own database, not someone else’s platform
- Affiliates sign up, grab links, and check earnings without ever leaving your site
- You set the rules on commissions, cookies, and approvals, and you can change them anytime
Honestly, for a bootstrapped store, that cost difference alone can decide whether an affiliate program is profitable in year one.
What You Need Before You Start
Before touching any settings, get these four things sorted:
- A live WooCommerce store with products that already sell. Affiliates promote things that convert.
- Your margin math. If your average margin is 40 percent, a 15 to 20 percent commission leaves room to breathe.
- A terms and conditions page covering rules like coupon abuse, which affiliates agree to during signup.
- FluentAffiliate. The free version handles the core program, and FluentAffiliate Pro unlocks the WooCommerce integration you will need.
Well, that is the prep done. Time to build the thing.
How to Set Up an Affiliate Program for WooCommerce with FluentAffiliate
The full setup takes about 30 minutes. Here is every step in order.
Step 1: Install the Free FluentAffiliate Plugin
Start with the free base plugin from the WordPress directory:
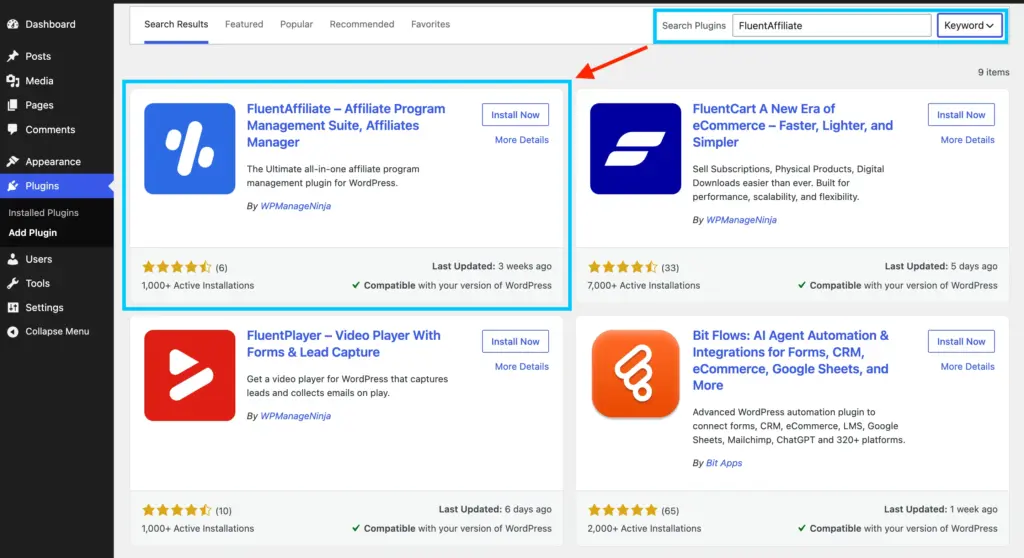
- Go to your WordPress dashboard and open Plugins, then Add New.
- Search for FluentAffiliate.
- Click Install Now, then Activate.
That gives you the core affiliate engine: registration, link generation, referral tracking, dashboards, and payout records. Full details are in the installation guide.
Step 2: Run the Onboarding Setup
Right after activation, FluentAffiliate opens a short onboarding wizard. Do not skip it, because it knocks out three foundational settings in a couple of minutes.
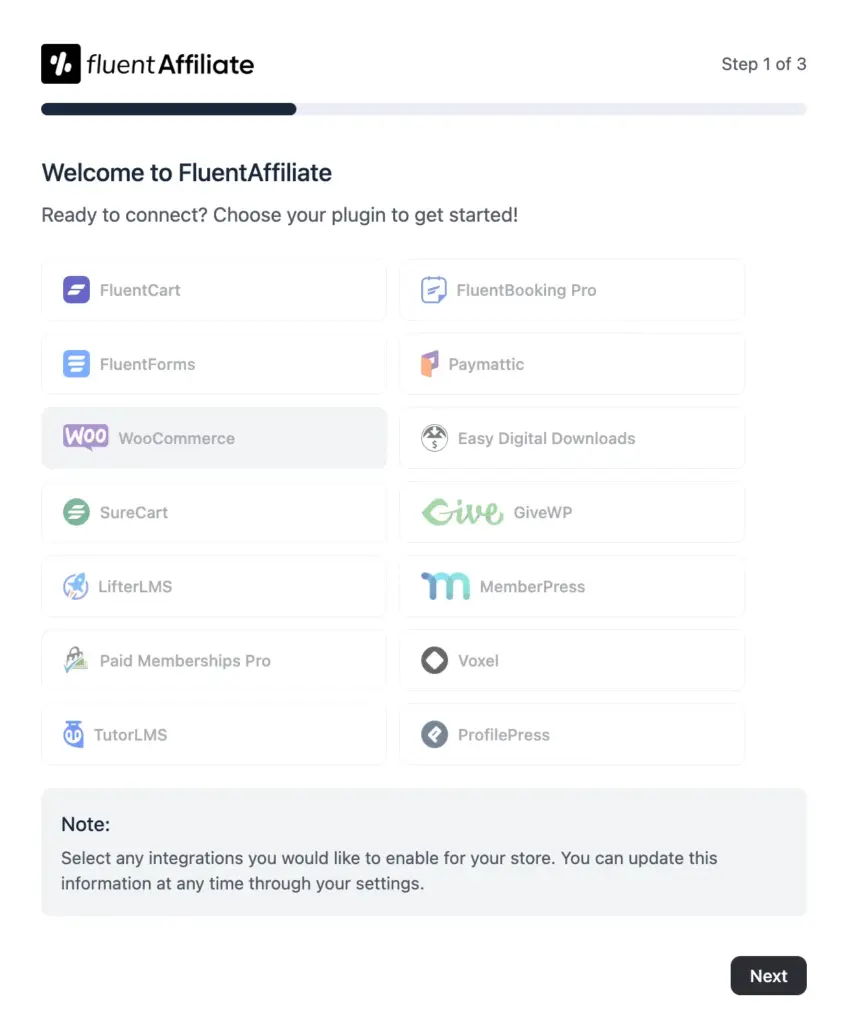
First, it asks which selling plugins you use. Check WooCommerce.
Second, you set your default commission structure:
- Referral Variable: the keyword in affiliate URLs. The default ref produces links like yourstore.com/?ref=123.
- Default Referral Format: choose whether links use the affiliate’s numeric ID or WordPress username. Both track the same.
- Rate: your global default commission, percentage or fixed. You can override it per product later, so set a baseline like 15 or 20 percent.
- Default Currency: the currency you pay commissions in.
Third, you create the Affiliate Portal page.
Pick an existing page or click the plus icon and let FluentAffiliate create one.
The plugin places the [fluent_affiliate_portal] shortcode there automatically, which renders the full dashboard where partners log in, generate links, and track earnings.
The onboarding guide covers each screen in more detail.
Click Finish and the foundation is live.
Step 3: Install FluentAffiliate Pro and Activate the License
The WooCommerce integration is a Pro feature, so this step is required for store tracking:
- Download the FluentAffiliate Pro zip file from your WPManageNinja dashboard.
- In WordPress, go to Plugins, then Add New, then Upload Plugin.
- Choose the Pro zip file, click Install Now, then Activate Plugin.
- Go to FluentAffiliate Pro, then Settings, then the License Management tab.
- Paste your license key and click Verify License.
The license activation matters beyond formalities. It unlocks automatic updates and support, and you will want both once real commissions are flowing.

Get FluentAffiliate Pro!
Step 4: Turn On the WooCommerce Integration
Now connect the two plugins:
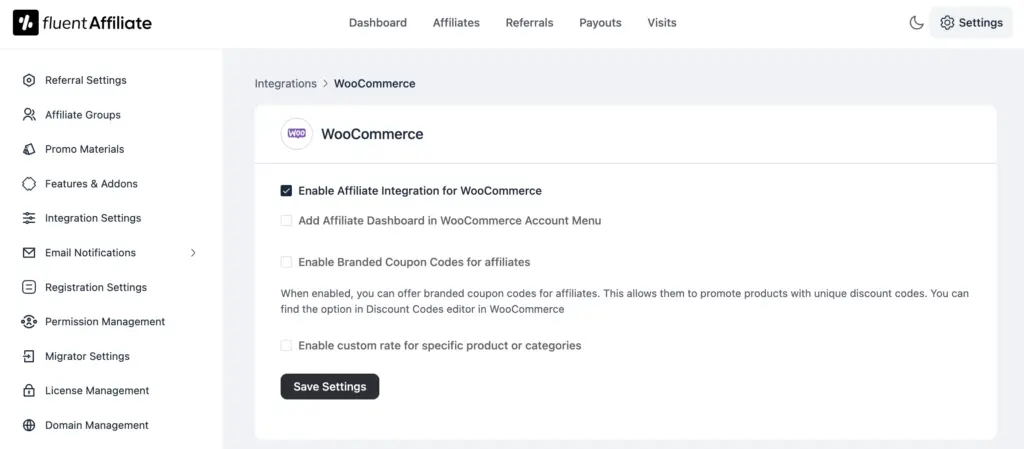
- Open the FluentAffiliate Dashboard and click Settings in the top menu.
- Select Integration Settings from the left sidebar.
- Find WooCommerce in the list and click the toggle to switch it on.
- A Manage link appears next to the toggle. Click it to open the WooCommerce settings panel.
Inside the panel, check the box for Enable Affiliate Integration for WooCommerce. That checkbox is the master switch.
Once it is on, every WooCommerce purchase that comes through an affiliate link automatically creates a referral record with the commission already calculated.
The WooCommerce integration doc walks through the same screens with screenshots.
Step 5: Configure Commission Rates for Products and Categories
Your global rate from onboarding applies to everything by default. But flat rates rarely fit a real catalog. Maybe your digital products carry 90 percent margins while your physical goods sit at 35 percent. Paying the same commission on both makes no sense.
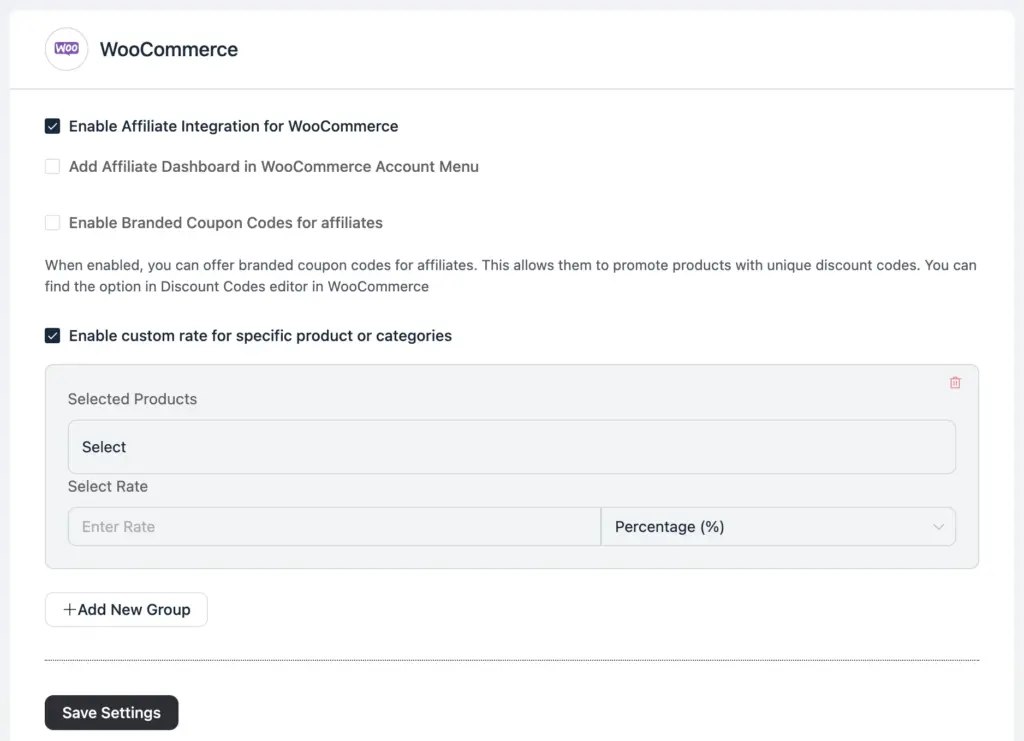
In the same WooCommerce Manage panel:
- Check Enable custom rate for specific product or categories.
- Click the +Add New Group button.
- Choose whether the rule applies to specific individual products or entire product categories.
- In the Select field, start typing a product or category name and pick it from the list.
- Enter the rate value, then choose Percentage or Fixed from the dropdown.
- Click +Add New Group again for each additional rule, and hit Save Settings when done.
A practical example: set 30 percent on a new product you want affiliates pushing hard, keep 15 percent as your default, and drop a low-margin category to a 5 dollar fixed amount. Custom rates override the global rate.
One related tip: if you want different rates per affiliate rather than per product, use Affiliate Groups. Create a group with its own rate, like a VIP tier at 25 percent, and manually assign your best partners to it from their profile.
Step 6: Set Up Branded Coupon Codes for Affiliates
Here is a feature often overlooked. Links are not the only way to track referrals. FluentAffiliate can credit an affiliate whenever a specific coupon code is used at checkout, no click required.
Why does that matter? Think about an Instagram influencer. Their audience hears “use code SARAH15” in a story and types it at checkout hours later. No link was clicked, but the sale still gets tracked to Sarah.
To enable it:
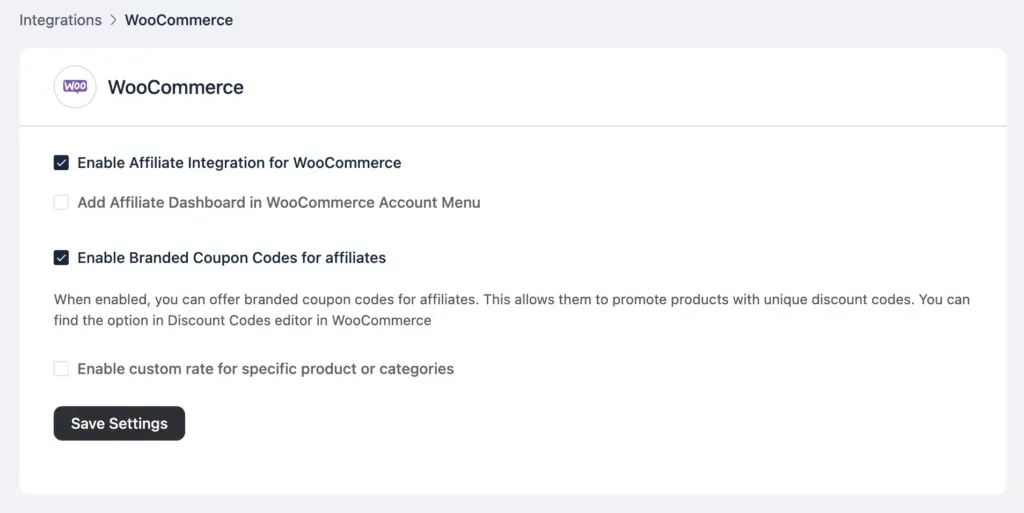
- In the WooCommerce Manage panel inside FluentAffiliate, check Enable Branded Coupon Codes for affiliates.
- From your WordPress dashboard, go to Marketing, then Coupon Data in WooCommerce.
- Create a new coupon or edit an existing one, and set the discount as usual.
- Scroll to the FluentAffiliate Coupon section on the coupon editor page.
- Click the dropdown and select the affiliate’s name.
- Save the coupon.
Every purchase using that code now credits the assigned affiliate automatically. One note: the person must already be an approved affiliate in your program before you can assign them a coupon.
Step 7: Fine-Tune Referral and Tracking Settings
Head to FluentAffiliate, then Settings, then Referral Settings. This screen controls the rules that decide who gets credit and when. Five settings deserve attention:
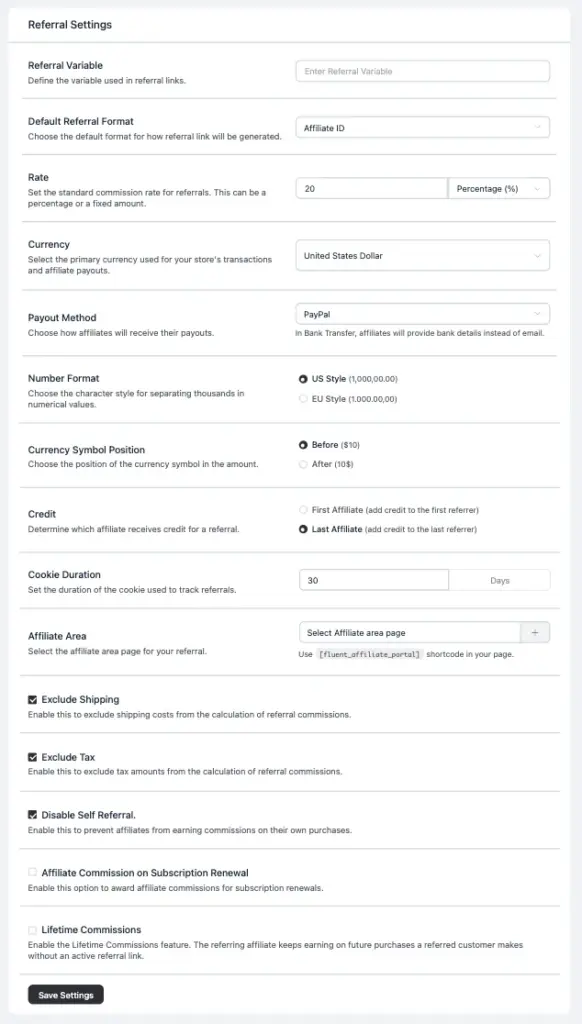
Cookie Duration
This is how many days a referral cookie stays valid after a click. If it is set to 30 days and a visitor clicks Sarah’s link today but buys three weeks from now, Sarah still gets paid.
Thirty days is a fair standard. Shorter windows favor you, longer windows attract affiliates. Learn more about cookie duration.
Credit
When a customer clicks links from two different affiliates before buying, someone has to win. FluentAffiliate lets you credit either the First Affiliate or the Last Affiliate, applied program-wide.
First credit rewards whoever introduced your brand, last credit rewards whoever closed the deal. Pick one and state it in your program terms so nobody feels cheated later. Learn more about affiliate attribution.
Exclude Shipping and Exclude Tax
Two toggles that remove shipping costs and tax from the amount commissions are calculated on. Most stores enable both, since paying commission on shipping fees quietly eats margin.
Disable Self Referral
Turn this on. Without it, an affiliate can buy your product through their own link and effectively give themselves a discount equal to the commission. This toggle blocks that outright.
Learn More: Affiliate Fraud: A Complete Awareness Guide
Payout Method
Choose PayPal or Bank Transfer. This determines what payment details affiliates provide in their portal, either a PayPal email or bank information.
Step 8: Open Affiliate Registration
Your tracking works, but nobody can join yet.
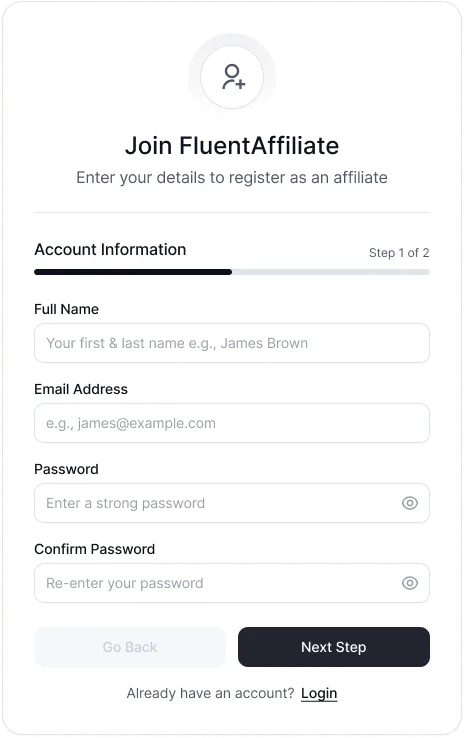
Go to Settings, then Registration Settings:
- Enable Affiliate Registration: This is the master switch that makes your public signup form live.
- Decide on Require admin approval for new affiliates: With approval on, every applicant lands in a pending queue and you review each one from their affiliate profile before they can promote you. With it off, anyone who registers becomes active instantly.
A piece of advice worth considering: keep manual approval on.
It takes a minute per application, and reviewing the “How will you promote us?” answer and the applicant’s website is your first line of defense against coupon scrapers and low-quality signups.
You can also customize the registration form here. Toggle fields like Website URL on or off, edit labels and placeholders, and mark fields as required. Keep the form short. Name, email, promotion method, and payment email cover what you need to make a decision.
New affiliates sign up from your Affiliate Portal page, agree to your terms, and either go live instantly or wait in your pending queue depending on the setting you chose.
Step 9: Give Affiliates Ready-Made Creatives
An approved affiliate who has to design their own banners usually promotes nothing. The Affiliate Creatives module fixes that by giving every partner ready-to-use promotional assets in their portal.
Go to Settings, then Affiliate Creatives, and click +Add New Creative. You can build three types:
- Image creatives: upload banners or product graphics with alt text. Affiliates grab an HTML embed code that already contains their unique tracking link.
- Text creatives: pre-written link text like “Get 20 percent off the Summer Collection” that renders as a tracked text link.
- QR code creatives: auto-generated QR codes with customizable colors, handy for affiliates who promote offline or on printed material.
Each creative can be public to all affiliates or private to specific affiliates or groups, and you can schedule creatives to activate and deactivate on set dates, which keeps holiday banners from floating around in March.
Step 10: Test Your Tracking Before Launch
Do not skip this. A single missed commission early on can sour an affiliate relationship permanently, and testing takes ten minutes.
- Create a test affiliate account using a different user, or approve a colleague.
- Log in to the Affiliate Portal, open the Links tab, paste a product page URL, and click Generate.
- Open the generated link in an incognito browser window so your admin session does not interfere with cookies.
- Run a test order through checkout.
- Back in your admin dashboard, open FluentAffiliate, then Referrals, and confirm a referral appeared with the right affiliate, amount, and status.
- Check the Visits page to confirm the click was logged with its landing URL and referrer.
If the referral shows up with the correct math, your tracking works end-to-end. If not, confirm the WooCommerce integration toggle is on and the link was generated from a valid, public product URL.
Step 11: Manage Referrals and Run Your First Payout
Once real orders flow in, day-to-day management happens in two places.
The Referrals page lists every tracked conversion with its affiliate, amount, status, and source order.
Referrals move through statuses: pending ones await your approval, unpaid ones are approved and waiting for payment, and paid ones are settled. You can edit or reject individual referrals, which is useful when a customer refunds an order.
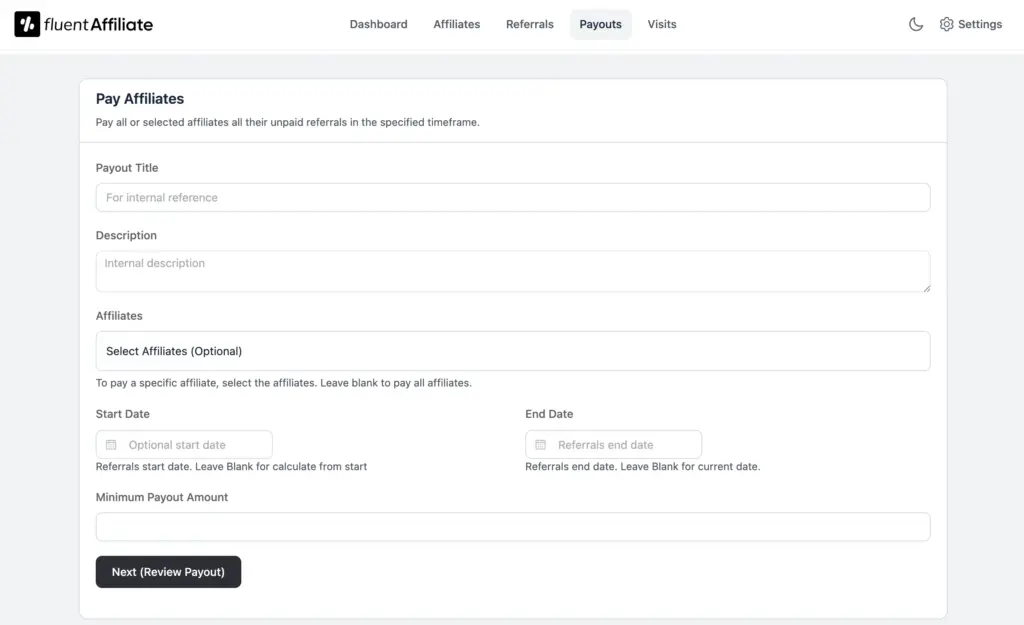
When it is time to pay, open the Payout tab and click Pay Affiliate:
- Give the payout a title and short description, like “March commissions.”
- Select specific affiliates or leave the field blank to include everyone with unpaid earnings.
- Set the date range you are paying for, such as last month.
- Set a Minimum Payout Amount so you are not sending 3 dollar payments. A 50 dollar threshold is common.
- Click Next, review, and confirm.
One thing to be upfront about: FluentAffiliate records payouts and generates reports, but it does not push money through payment gateways automatically. You send the payments yourself through PayPal or bank transfer using the details each affiliate provided, and the plugin keeps a permanent record.
The Transactions tab exports a CSV with every affiliate’s name, payout email, and amount, which makes mass payments and bookkeeping painless.
How Much Commission Should You Offer
There is no universal number, but there is a reliable way to find yours. Work backwards from margin, then check what competitors in your niche pay.
For physical products with 30 to 50 percent margins, commissions typically land between 8 and 20 percent. For digital products, where the margin on each extra sale is nearly all profit, 25 to 40 percent is common and expected.
A few practical rules from stores that get this right:
- Never launch at your maximum. Starting at 15 percent leaves room to reward top performers later, which beats starting at 30 with nowhere to go.
- Use custom product rates to steer affiliate attention toward new launches or high-margin items.
- Consider a VIP tier through Affiliate Groups. Moving your top five affiliates to a higher-rate group costs little and builds loyalty.
In simple terms, your commission is a marketing budget you only spend on results. Be generous enough that promoting you beats promoting your competitor.
Explore More: Affiliate Commission Structure: Choose the best model for your Business
Common Mistakes to Avoid
A few traps catch almost every first-time program owner:
- Launching without testing. Broken tracking discovered by an affiliate, not by you, is a trust problem you may never fully repair.
- Leaving self-referrals open. If the Disable Self Referral toggle is off, affiliates can shop through their own links. Some stores allow this as a deliberate perk, but it should be your decision, not an oversight.
- Auto-approving everyone. Open registration invites coupon sites and bots. Manual approval keeps program quality high.
- Paying commission on shipping and tax. Forgetting those two exclude toggles quietly inflates every commission you pay.
- Recruiting affiliates and going silent. Your best partners are often existing customers who already love your products. Invite them personally, hand them creatives, and check in monthly. Ten active affiliates beat 200 dormant signups.
Final Note
Setting up an affiliate program for WooCommerce is one of the few marketing moves where the risk genuinely sits on the other side of the table. You configure it once, and from that point on you only pay when money comes in.
The whole build takes about 30 minutes: install FluentAffiliate, activate the WooCommerce integration, set your commission rates and tracking rules, open registration, and test one order before going live.
FluentAffiliate keeps everything inside your WordPress dashboard, so there are no network fees, no monthly SaaS bills, and no third party sitting between you and your affiliate data.
Ready to turn your happiest customers into your best salespeople? Install FluentAffiliate, follow the eleven steps above, and send your first affiliate invite today.
FAQ
What Is the Best Affiliate Plugin for WooCommerce?
The best affiliate plugin for WooCommerce depends on your priorities, but FluentAffiliate stands out for self-hosted store owners because it runs the entire program inside WordPress with no network fees, offers per-product commission rates, branded coupon tracking, and detailed dashboards for both admins and affiliates.
Does WooCommerce Have a Built-In Affiliate Program?
No, WooCommerce does not include built-in affiliate program functionality. You need a dedicated affiliate plugin like FluentAffiliate to add registration, referral tracking, commission calculation, and payout management to your store.
How Much Does It Cost to Run an Affiliate Program on WooCommerce?
Running an affiliate program on WooCommerce costs the price of your affiliate plugin license plus the commissions you pay on actual sales. With a self-hosted plugin like FluentAffiliate, there are no monthly network fees or per-transaction charges, unlike SaaS affiliate networks.
How Do Affiliates Get Paid in FluentAffiliate?
Affiliates get paid manually through PayPal or bank transfer using the payment details they add in their portal. FluentAffiliate calculates commissions, batches unpaid earnings into payouts, and exports a CSV report, while you send the actual money and the plugin records each transaction.
Can Affiliates Earn Commissions Through Coupon Codes Instead of Links?
Yes, FluentAffiliate supports branded coupon codes for WooCommerce. You assign a WooCommerce coupon to a specific approved affiliate, and every order using that code credits the affiliate automatically, even if the customer never clicked a referral link.
How Long Should My Affiliate Cookie Duration Be?
A 30-day cookie duration is the most common standard for WooCommerce affiliate programs. It gives customers enough time to decide while keeping attribution fair, and you can set any number of days in FluentAffiliate’s Referral Settings.
How Do I Stop Affiliates From Abusing My Program?
Enable the Disable Self Referral setting to block affiliates from earning on their own purchases, require admin approval for new registrations so you can vet every applicant, and review the Visits log regularly to spot suspicious traffic patterns before approving referrals.



Add your first comment to this post