

Affiliate Campaign Management: The Essential Guide for WordPress Business Owners
You launched an affiliate program, invited a handful of partners, and shared some links. Three months later, half your affiliates have gone quiet, you have no idea which links actually drive sales, and someone just emailed asking where their commission is.
That mess is not a people problem.
It is a management problem, and it has a fix you can run entirely from your WordPress dashboard.
Key Takeaways: Affiliate Campaign Management
- Affiliate campaign management is the repeatable process of planning, launching, tracking, optimizing, and paying out time-bound affiliate promotions.
- A campaign is a focused, time-boxed push inside your affiliate program, not the program itself.
- Every campaign needs one primary goal and one metric that decides whether it worked.
- Commission structure, cookie duration, and credit rules should be set before you invite a single affiliate.
- Ready-made, scheduled promotional assets are what turn passive affiliates into active campaign participants.
- Click-level tracking with UTM data tells you which affiliates and channels convert, not just which ones send traffic.
- Closing every campaign with prompt payouts and a short review is what turns one good campaign into a system.
What Is Affiliate Campaign Management
Affiliate campaign management is the process of planning, launching, tracking, optimizing, and paying out affiliate marketing campaigns from a central system. It covers everything from setting commission rates and recruiting partners to distributing promotional assets, monitoring clicks and conversions, and recording payouts once the campaign ends.
In simple terms, it is the difference between having affiliates and actually running them. Plenty of WordPress site owners technically have an affiliate program. Far fewer manage it as a series of deliberate campaigns with goals, timelines, and reviews.
How a Campaign Differs From an Affiliate Program
Your affiliate program is the permanent structure: the registration page, the default commission rate, the terms and conditions, the payout schedule. A campaign is a specific push that runs inside that structure for a defined period.
A summer sale where affiliates earn a boosted 30 percent commission for six weeks is a campaign. A product launch where your top ten partners get exclusive banners and a dedicated coupon code is a campaign. The program is the house. Campaigns are the parties you throw in it.
That distinction matters because most advice online treats the two as the same thing. When you separate them, managing each becomes much easier.

Launching Affiliate Program? Explore Complete 101 Guide!
Why Campaign Management Matters for WordPress Business Owners
The affiliate channel is not a side experiment anymore, and the numbers back that up. Here is why putting a real management system behind your campaigns is worth the effort:
- The channel is serious money. Global affiliate marketing spend is projected to reach roughly $18.5 billion in 2026 according to Forrester forecast data cited by industry roundups, and US spend alone is expected to pass $12 billion this year per Statista projections.
- Your competitors are already in. Around 81 percent of brands now run some form of affiliate program, so an unmanaged program means competing against managed ones.
- Most of that spend flows through networks and SaaS platforms that charge monthly fees, take a cut of transactions, or both. As a WordPress owner, you can skip those costs entirely.
- You own the site where the sale happens. Running campaigns on your own infrastructure means your tracking data lives in your own database instead of a third-party platform.
- Your affiliates log into a portal on your own domain, which keeps the entire partner relationship under your brand.
- Owning the system means owning the management. Nobody at a network is vetting your partners or flagging your underperformers, so a repeatable process has to replace that missing manager.
The rest of this guide walks through the seven steps that make up that process, followed by a dedicated look at how to run each step with FluentAffiliate.
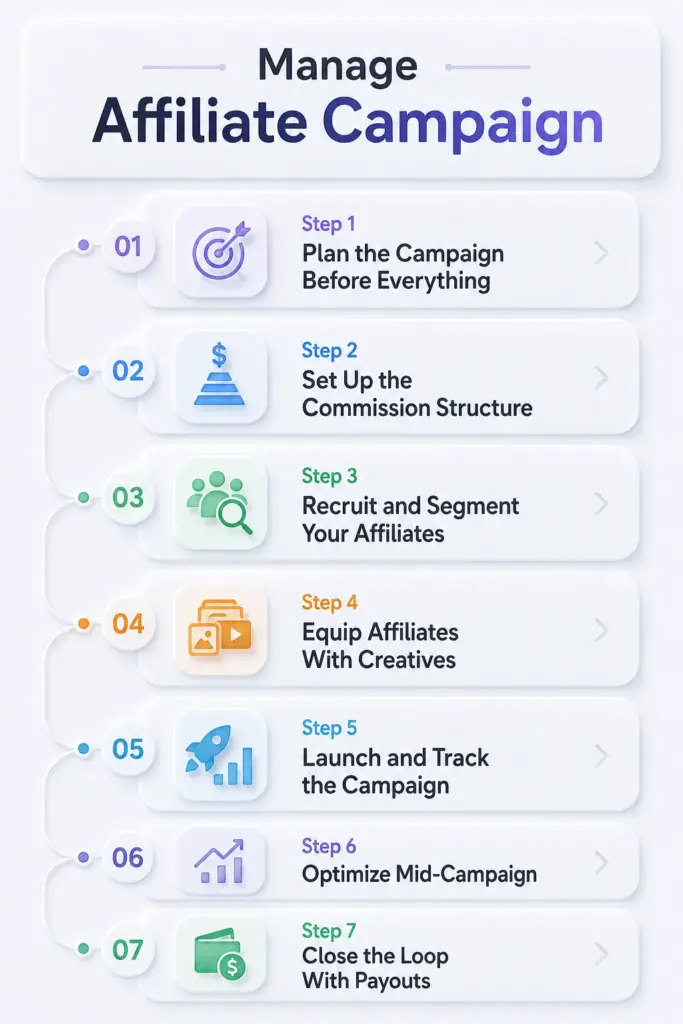
Step 1: Plan the Campaign Before You Touch Any Settings
Honestly, this is where most campaigns quietly fail. Not at launch. Before it.
A campaign without a written plan turns into “we bumped commissions for a while, and some sales happened.” You cannot optimize that, and you definitely cannot repeat it. So before opening any dashboard, answer four questions:
What is the one goal?
Pick a single primary outcome. More first-time customers for a new product. Clearing seasonal inventory. Reactivating dormant affiliates. One goal per campaign keeps every later decision simple.
What is the offer?
Affiliates promote harder when there is something specific to promote. A discount for their audience, a boosted commission for them, or ideally both. A course creator might pair a 20 percent student discount with a temporary commission bump for partners.
What is the timeframe?
Open-ended campaigns create no urgency for anyone. Two to eight weeks works for most WordPress businesses. Long enough to gather real data, short enough that affiliates act now instead of later.
What number decides success?
Choose one metric that matters. Referral count, total order value from referrals, or conversion rate on affiliate traffic. Write it down with a target. Fifty referrals in six weeks is a plan. “More sales” is a wish.
Step 2: Set Up the Commission Structure
Your commission structure is the engine of the campaign, and it deserves more thought than picking a number that feels generous.
Start with the default rate.
It can be a percentage of the sale or a flat amount per referral. Percentages scale naturally with cart value, which suits stores with wide price ranges. Flat rates make earnings predictable, which some affiliates genuinely prefer for lower-priced products.
Then layer in campaign-specific rates.
If the campaign centers on particular products, you do not need to raise commissions across the board. Setting a higher rate only on the featured products, say 35 percent on the new course while everything else stays at 20 percent, points affiliate energy exactly where you want it.
Reward your best partners differently.
Tiered rates for proven performers, such as a standard tier at 20 percent and a VIP tier at 30 percent, recognize the reality that a small group of affiliates usually drives most of your results.
Finally, set your tracking rules before launch.
Cookie duration determines how long after a click a purchase still credits the affiliate, and 30 days is a common default. Credit rules decide what happens when two affiliates refer the same buyer: first-click favors partners who introduce your brand to new audiences, while last-click favors those who close the deal.
Pick the one that matches how your buyers actually shop, and keep it consistent so affiliates always know the rules.
Explore In-depth: Affiliate Commission Structure: Choose the best model for your Business
Step 3: Recruit and Segment Your Affiliates
A campaign is only as strong as the people running it, and recruiting for a specific campaign is easier than recruiting cold. “Join our program” is vague. “Earn 30 percent promoting our summer launch” is a pitch.
Ask the right question at signup.
A registration field asking how applicants plan to promote you tells you more about a partner’s potential than anything else on the form. Someone who writes “my food blog gets steady traffic from freezer meal recipes” is a very different prospect from someone who writes “social media.”
Vet before you approve.
Reviewing every application manually takes a minute per applicant, and it is your first and best line of defense against low-quality or fraudulent partners. Pair it with a rule that blocks affiliates from earning commission on their own purchases.
Do not overlook your customers.
Your happiest buyers already trust the product and speak your audience’s language. Course creators and membership site owners see this constantly: students and members convert their peers far more naturally than outside publishers do, because the recommendation carries lived experience.
Then segment.
As approvals come in, sort affiliates into tiers. Established performers go into the high-rate group, new recruits start in the standard one. This segmentation pays off in the next step, because you can hand different assets to different groups.
Read More: How to Recruit Affiliates for Your Business
Step 4: Equip Affiliates With Campaign Assets
Here is a pattern worth internalizing: affiliates promote what is easy to promote. If joining your campaign means designing their own banners and writing their own copy, most will simply not bother. Your job is to make participation a copy-and-paste exercise.
At minimum, a campaign asset kit includes:
- Banner images sized for blogs and sidebars, with the campaign offer stated plainly.
- Ready-made text links, like “Save 20 percent during the Summer Sale,” so affiliates can drop a working link into a newsletter in seconds.
- QR codes for partners who promote offline, at events, or on printed materials.
- Coupon codes tied to individual affiliates, which travel where links struggle: podcasts, YouTube videos, and Instagram stories.
Two details separate a decent kit from a great one. First, timing. Campaign assets should appear when the campaign opens and disappear when it closes, so nobody keeps promoting an expired offer. Second, exclusivity. Giving your top tier assets that nobody else gets, such as a dedicated landing page with their name on it, is a quiet but real motivator for partners deciding where to spend their promotional energy.
Read More: 15 Affiliate Creatives that Benefit Both Your Partners and Your Brand
Step 5: Launch and Track the Campaign
Launch day is mostly communication.
Tell your affiliates the campaign is live, point them to the assets, restate the offer and the end date, and get out of their way. The real management work now shifts to watching the data.
Headline numbers give you the pulse: total visits, total referrals, conversion rate, and total order value from referrals. Check these against the target you wrote in Step 1. But headline numbers tell you what happened, not why. For that, you need click-level data.
A proper visits log records every single click on an affiliate link: the destination page, the referring source, the affiliate responsible, and whether that click converted. Filtering converted clicks from non-converted ones immediately separates traffic that turns into revenue from traffic that just looks busy.
UTM parameters deserve special attention.
Ask affiliates to tag their links at launch, something like utm_campaign=summer-sale with a medium for each channel. Two weeks in, you will know whether the newsletter placements or the blog reviews are actually driving purchases, per affiliate, per channel. That is the kind of insight enterprise platforms charge serious money for.
Learn More: 8 Affiliate Tracking Methods & How They Actually Work on WordPress
Step 6: Optimize Mid-Campaign
The difference between managing a campaign and merely hosting one shows up in week two or three, when the first real data arrives and you act on it.
Start with the conversion picture per affiliate.
Compare visits against referrals for each partner. An affiliate sending 800 visits with two conversions has a traffic quality problem or a message mismatch. An affiliate sending 60 visits with nine conversions is your hidden gem, and probably deserves a higher commission tier before the campaign ends.
Watch for creative fatigue. If clicks on a particular banner slow down noticeably mid-campaign, swap in a fresh variation.
Keep the referrals queue moving.
Pending referrals waiting days for approval quietly kill affiliate trust. A quick daily review, approving the legitimate ones and rejecting anything that smells wrong, keeps the pipeline healthy. While you are there, scan for patterns like a burst of referrals from one affiliate with identical order values, which is worth a closer look in the click logs.
Communicate at least once mid-campaign. A short update with the leaderboard leaders and days remaining nudges quiet affiliates into action.
Step 7: Close the Loop With Payouts and Review
How a campaign ends determines whether your best affiliates show up for the next one. Two things need to happen: people get paid, and you learn something.
Payouts first.
Create a payout batch scoped to the campaign’s date range, apply a minimum payout threshold to filter out balances too small to process, and keep a clean record of who was owed what and when it was sent. Pay on time, every time. Affiliates forgive a lot, but late payments are how programs earn a bad reputation in a niche fast.
Then run a short review before the campaign fades from memory.
Did you hit the target metric from Step 1? Which three affiliates drove the most value, and what do they have in common? Which asset earned the most converted clicks?
What would you change about the commission structure?
Fifteen minutes of notes turns this campaign into the template for the next one, and that compounding is the whole point of managing campaigns as a system.
How FluentAffiliate Handles Every Step of Campaign Management
Everything above is the playbook. FluentAffiliate is the tool that runs it from inside WordPress, on your own site, with your data in your own database. Here is how the plugin maps to each step.
Planning and Baseline Data
The admin dashboard shows total paid, total unpaid, active affiliates, visits, referrals, conversion rate, and total order value from referrals in one view, with a growth graph you can filter by date range.
Before a campaign starts, this is where you pull your baseline numbers so you know what “better” actually looks like.
Commission Structure
Referral Settings hold your default rate as a percentage or flat amount, plus the cookie duration and the First Affiliate or Last Affiliate credit rule, all configured program-wide.
For campaign-specific rates, the integrations for WooCommerce, Easy Digital Downloads, MemberPress, TutorLMS, and others let you set custom rates for specific products or categories that override the global default. Note that several of these integrations, including WooCommerce, are Pro features.
For partner tiers, Affiliate Groups let you create groups with their own rates and assign affiliates to them manually from their profiles.
Recruitment and Vetting
Registration Settings control the signup form, including the “How will you promote us?” field, and the admin approval option holds every applicant as pending until you review them. The Disable Self Referral toggle in Referral Settings blocks affiliates from earning on their own purchases.
Campaign Assets
The Affiliate Creatives module is where the asset kit lives.
You upload image, text, and QR code creatives once, and every affiliate finds them in their portal with their unique tracking link already baked in.
Set a creative’s status to Scheduled with a start and end date and time, and it appears in affiliate dashboards when the campaign opens and disappears when it closes.
Mark a creative as Private to share it only with a specific group or individual affiliates, which is how your VIP tier gets exclusive assets.
Branded coupon codes are available through the WooCommerce, EDD, and FluentCart integrations: create a standard coupon, assign it to an approved affiliate, and every use of the code credits them automatically.
For top partners, the fluent_aff_custom_landing shortcode lets you build an admin-created landing page assigned to one affiliate, giving them a clean URL like yoursite.com/partner/sarah.
Tracking
The Visits page logs every click with the URL, referrer, responsible affiliate, UTM campaign, medium, and source, plus a Converted and Not Converted filter and a direct link from each converted visit to its referral record.
If you would rather not live in the dashboard, the Performance Summary Email Digest in Email Settings sends a recap on a schedule you choose, with a daily option for active campaign periods, and sale notifications can alert both you and the affiliate the moment a referral lands.
Mid-Campaign Optimization
Each affiliate’s profile shows their all-time stats, referrals, visits, and conversion rate, which is where you spot the hidden gems and the high-click low-conversion partners. Because creatives live in one central module, updating an asset updates it for every affiliate at once.
And if you run FluentCRM alongside FluentAffiliate, the integration adds affiliates to a contact list automatically and provides triggers like New Referral Created for automated campaign emails. Worth being clear: that automation lives in FluentCRM, so you need both plugins for it.
Payouts and Records
Payout Management creates payout batches by date range with a minimum payout amount filter, covering all eligible affiliates or just the ones you select.
One honest clarification: FluentAffiliate records and reports payouts; it does not push money through payment gateways. You export the CSV, which includes each affiliate’s payout email and amount, and send the payments yourself through PayPal or bank transfer.
For most WordPress-scale programs, that is a 20-minute monthly task, and the paper trail the plugin keeps is what makes it painless.
Final Thoughts
Affiliate campaign management sounds like a job title from a company much bigger than yours. In practice, it is a loop you can run in a few hours a week: plan one focused campaign, set the commission structure to match, recruit and segment deliberately, hand affiliates ready-made assets, watch the click data, adjust while the campaign is live, and close with prompt payouts and a quick review.
Every ranking guide on this topic assumes you will rent that system from a network or an agency. You do not have to. FluentAffiliate puts the full loop inside your WordPress dashboard, from scheduled creatives and affiliate groups to UTM-level tracking and payout records, with your data staying on your own site.
Install it, run one small campaign end to end, and you will have a repeatable playbook that gets sharper every cycle. Your first campaign is one plan away.
FAQs
What Is Affiliate Campaign Management?
Affiliate campaign management is the process of planning, launching, tracking, optimizing, and paying out time-bound affiliate marketing promotions from a central system. It includes setting commission rates, recruiting affiliates, distributing creatives, monitoring clicks and conversions, and recording payouts.
How Is an Affiliate Campaign Different From an Affiliate Program?
An affiliate program is the permanent structure, including registration, default commissions, and terms. A campaign is a focused, time-limited promotion that runs inside that program, such as a six-week launch push with boosted commissions and dedicated banners.
Can I Manage Affiliate Campaigns Directly From WordPress?
Yes. A self-hosted plugin like FluentAffiliate handles the full campaign loop inside your WordPress dashboard, including commission settings, affiliate recruitment, creatives, click and conversion tracking, and payout records, without monthly network fees or per-sale platform cuts.
How Long Should an Affiliate Campaign Run?
Most affiliate campaigns for small and mid-sized businesses run two to eight weeks. That window is long enough to collect meaningful conversion data and short enough to create urgency for both affiliates and their audiences.
What Metrics Should I Track During an Affiliate Campaign?
Track visits, referrals, conversion rate, and total order value from referrals at the program level, then use per-affiliate visit logs with UTM data to see which partners and channels actually convert rather than just sending clicks.
How Do I Motivate Affiliates During a Campaign?
Give them a specific offer to promote, ready-made creatives with their tracking links included, tiered commission rates for top performers, mid-campaign progress updates, and payouts that arrive exactly when promised.
Does FluentAffiliate Send Affiliate Payments Automatically?
No. FluentAffiliate records payout batches and exports detailed CSV reports, but the actual payments are sent manually through PayPal or bank transfer using each affiliate’s payout details. This keeps you in full control of every transaction.




Add your first comment to this post