

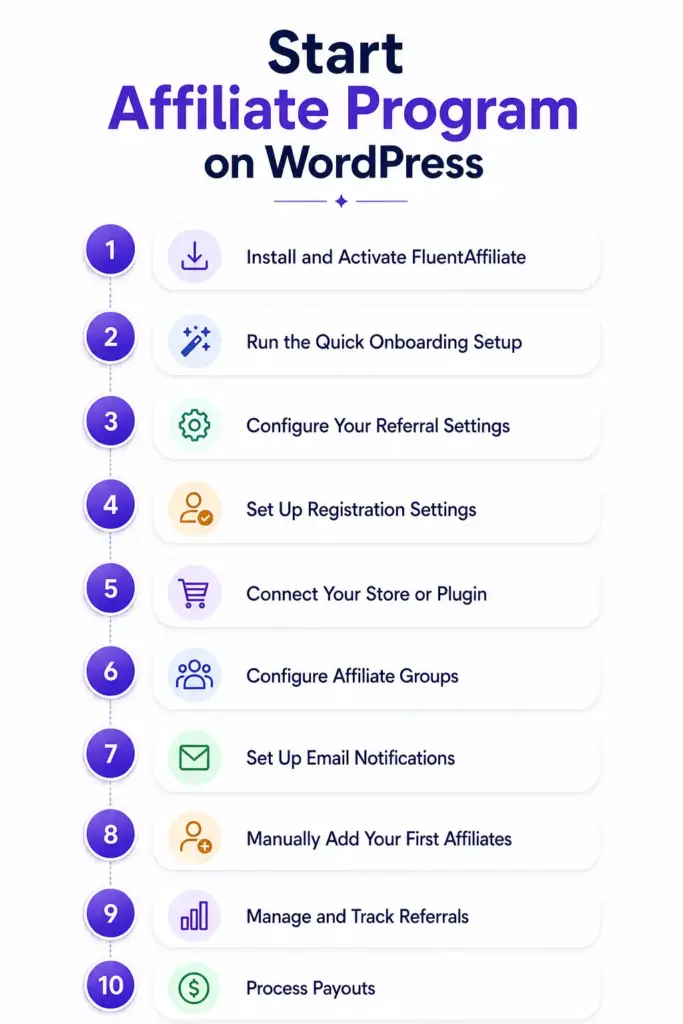
How to Set Up an Affiliate Program on WordPress (Step-by-Step Guide)

Want more sales without spending more on ads? An affiliate program lets real people promote your business, and you only pay them when they deliver a sale.
The problem is, most tutorials make the setup sound complicated. It’s not. With FluentAffiliate, you can launch a fully functional affiliate program on WordPress in under an hour; no developer, no third-party platform, no headaches.
This guide walks you through every step, from installation to your first payout.
Key Takeaways: Affiliate Program on WordPress
- You can set up a complete affiliate program on WordPress without a developer or third-party platform. FluentAffiliate handles everything natively inside your dashboard.
- The core setup flow is: install the plugin → configure commission rules → connect your store integration → create an affiliate portal page.
- Set cookie duration (30–90 days) and credit attribution (first vs. last affiliate) carefully; these two settings directly impact how commissions are awarded.
- Use manual affiliate approval when starting out so you can vet who represents your brand before they go live.
- Affiliate groups let you build commission tiers; a simple, powerful way to reward top performers and motivate the rest.
- FluentAffiliate records what each affiliate is owed and lets you export a CSV to pay via PayPal or bank transfer.
- The best-performing affiliate programs pair good commission rates with strong resources; use Affiliate Creatives, custom landing pages, and regular communication to keep affiliates active and motivated.
What Is an Affiliate Program (and Why You Need One)?
Before we jump into the setup, let’s make sure we’re on the same page.
An affiliate program is basically a referral system where other people (your affiliates) promote your products or services using a unique tracking link. When someone clicks that link and makes a purchase, your affiliate earns a commission. You make a sale. Everyone wins.
Here’s why it’s so powerful for WordPress site owners:
- Zero upfront cost. You only pay when a sale happens. No wasted ad spend.
- Scalable growth. More affiliates = more reach, without more work on your end.
- Built-in trust. People trust recommendations from real humans far more than banner ads.
- Works for any niche. Selling courses, physical products, memberships, digital downloads, and affiliate marketing works across the board.
New to Affiliate Arena? Start with Affiliate Program 101
What You’ll Need Before You Start
Before we dive into the actual setup, let’s make sure you have everything in place:
- A live WordPress website: self-hosted, not WordPress.com
- A product or service to sell: this could be WooCommerce products, digital downloads, courses, memberships, bookings, and more
- The FluentAffiliate plugin: free version is available on the WordPress plugin directory; Pro version unlocks advanced integrations
That’s really it. No coding knowledge needed. No third-party platform accounts to manage.
Step 1: Install and Activate FluentAffiliate
The first step is to install FluentAffiliate on your WordPress site. This is your affiliate management hub; it handles everything from affiliate registration to commission tracking to payout records.

Here’s how to install the free version:
- Log in to your WordPress dashboard.
- Navigate to Plugins → Add New.
- Search for “FluentAffiliate” in the search bar.
- Click Install Now next to the FluentAffiliate plugin.
- Once it finishes, click Activate.
That’s it, the plugin is now live on your site.
If you’re using FluentAffiliate Pro (which unlocks integrations like FluentCart, WooCommerce, MemberPress, EDD, SureCart, and more), here’s what to do after installing the free base plugin:
- Download the Pro .zip file.
- Go to Plugins → Add New → Upload Plugin.
- Upload the .zip file and click Install Now.
- Click Activate Plugin.
Then, to activate your license key:
- Go to FluentAffiliate Pro → Settings → License Management.
- Paste your license key in the License Key field.
- Click Verify License.
Once activated, you’ll see the FluentAffiliate menu appear in your WordPress dashboard sidebar. Click on it to get started.
Step 2: Run the Quick Onboarding Setup
When you open FluentAffiliate for the first time, it walks you through a simple 3-step onboarding wizard. It’s quick, and it sets up the most important parts of your affiliate program right away.
Let’s go through each step.
Onboarding Step 1: Connect Your Plugins
FluentAffiliate will ask you which platforms you’re using to sell. This helps it know where to track commissions.
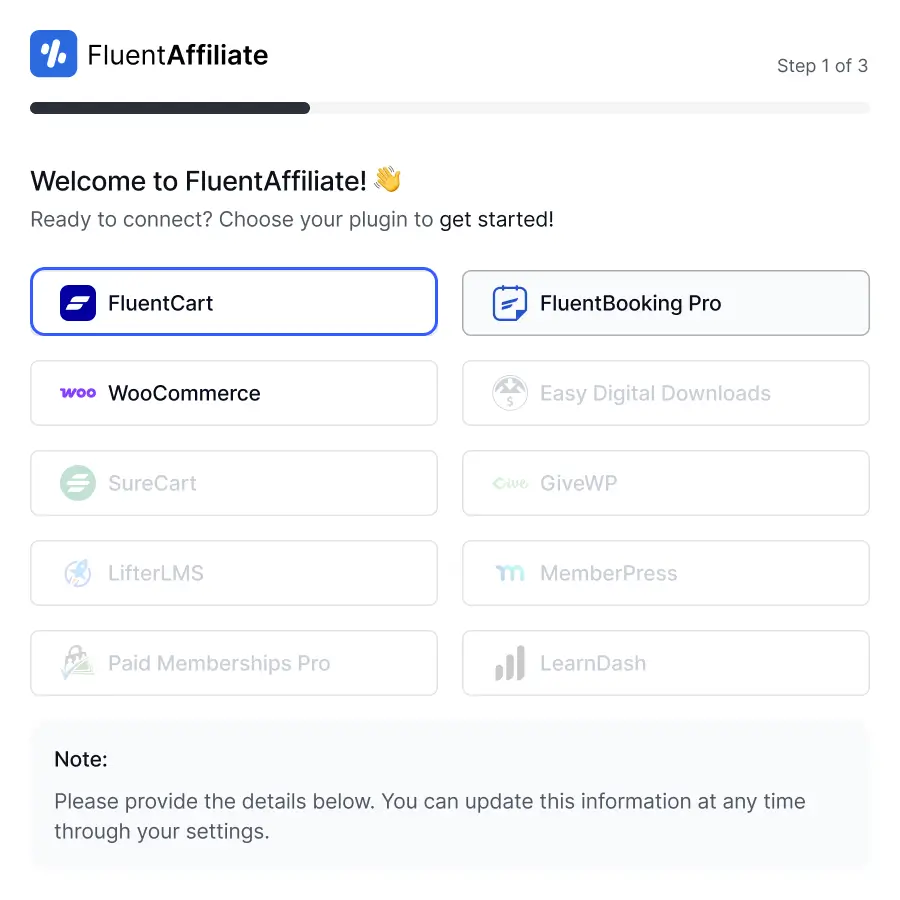
Check the boxes for any plugins you have installed: FluentCart, WooCommerce, Fluent Forms, EDD, Tutor LMS, and more.
Click Next when you’re done.
Onboarding Step 2: Set Your Default Commission
This is where you define the basic commission structure for your entire program.

- Referral Variable: This is the keyword that appears in affiliate URLs. For example, if you set it as ref, an affiliate link looks like yoursite.com/?ref=username. Keep it short and simple.
- Default Referral Format: Choose whether links use the affiliate’s numeric ID or their WordPress username. Either works, the username option is friendlier for affiliates.
- Rate: Set your default commission. You can choose a percentage (e.g., 20%) or a fixed amount (e.g., $10 per sale).
- Default Currency: Select the currency you’ll use for payouts.
Click Next once you’ve configured these.
Onboarding Step 3: Create Your Affiliate Portal
Your affiliates need a place to log in, check their stats, grab their links, and view their payouts. This is your Affiliate Portal: a dedicated page on your website.
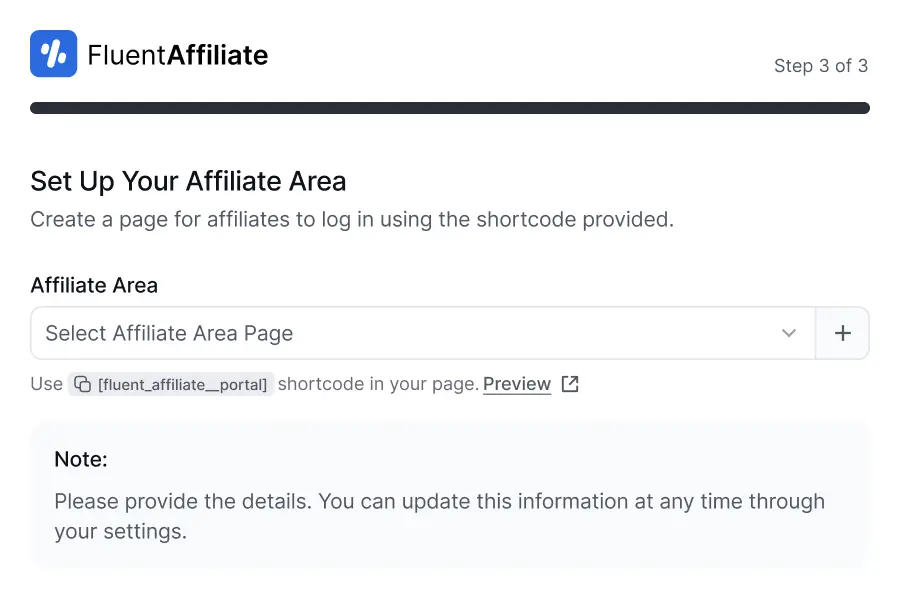
You can either choose an existing page or create a new one right here by clicking the plus (+) icon.
FluentAffiliate automatically adds the [fluent_affiliate_portal] shortcode to the page you select. That shortcode is what makes the full affiliate dashboard appear on that page.
Click Finish, and your initial setup is done.
Start Your Own Affiliate Program Today!
Step 3: Configure Your Referral Settings
The onboarding wizard covers the basics, but your Referral Settings page is where the real customization happens. Let’s go deeper.
Navigate to FluentAffiliate → Settings → Referral Settings.
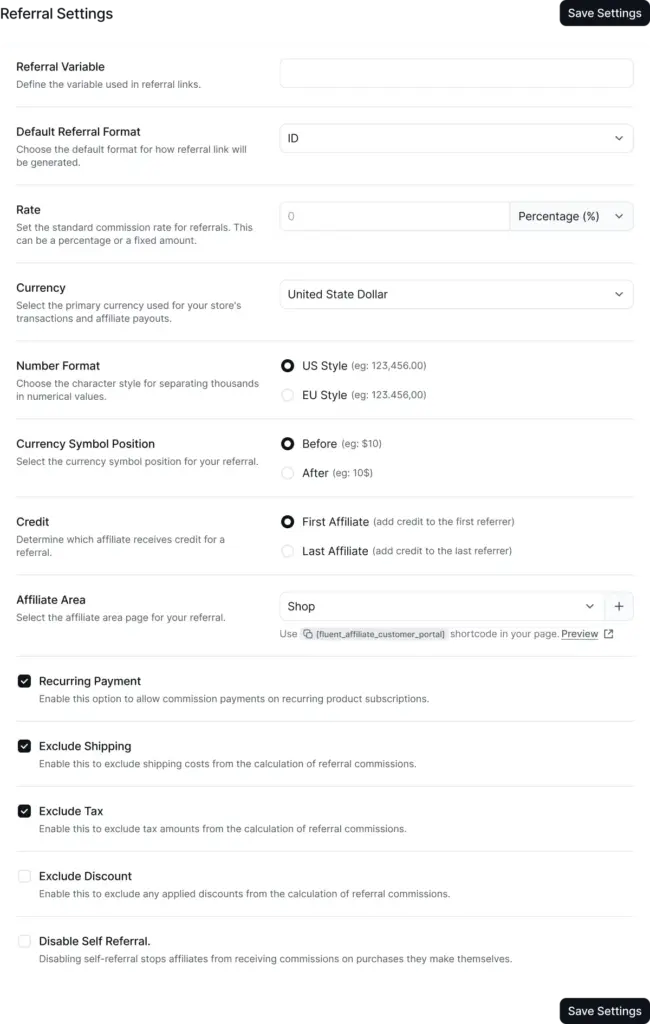
Setting 1: Commission and Link Settings
You’ve already set the defaults, but here you can fine-tune them:
- Referral Variable: Change the URL parameter if needed (the default ref works well for most sites).
- Default Referral Format: Switch between Affiliate ID and WordPress Username.
- Rate: Update your default commission rate at any time.
Read In-depth: Affiliate Commission Structure: Choose the best model for your Business
Setting 2: Financial Formatting
These settings control how numbers display across your program:
- Currency: Select your store currency (USD, EUR, GBP, etc.).
- Number Format: Choose US style (1,000.00) or EU style (1.000,00).
- Currency Symbol Position: Put the symbol before or after the amount.
- Payout Method: Choose between PayPal (affiliates enter their PayPal email) or Bank Transfer (affiliates provide bank details). This controls what information affiliates are asked for in their settings.
Setting 3: Tracking and Credit Rules
These are arguably the most important settings to get right:
- Credit: Decide who gets credit when multiple affiliates are involved. First Affiliate credits whoever referred the visitor first. Last Affiliate credits the most recent referrer. For most programs, Last Affiliate works well.
- Cookie Duration: How long does the tracking cookie last? The default is 30 days, which is a solid standard. You can increase this to 60 or 90 days to be more affiliate-friendly.
Learn More: How Do Affiliate Links Track Customer Purchases?
Cost Exclusions and Self-Referral Prevention
- Exclude Shipping: Toggle this on if you don’t want to pay commission on shipping costs.
- Exclude Tax: Toggle on to exclude tax from commission calculations.
- Disable Self Referral: This is important, enable it so affiliates can’t just use their own link to buy something and earn a commission on themselves.
Hit Save Settings when you’re done.
Step 4: Set Up Registration Settings
Now you need to decide how new affiliates will join your program. FluentAffiliate gives you full control over this.
Go to FluentAffiliate → Settings → Registration Settings.
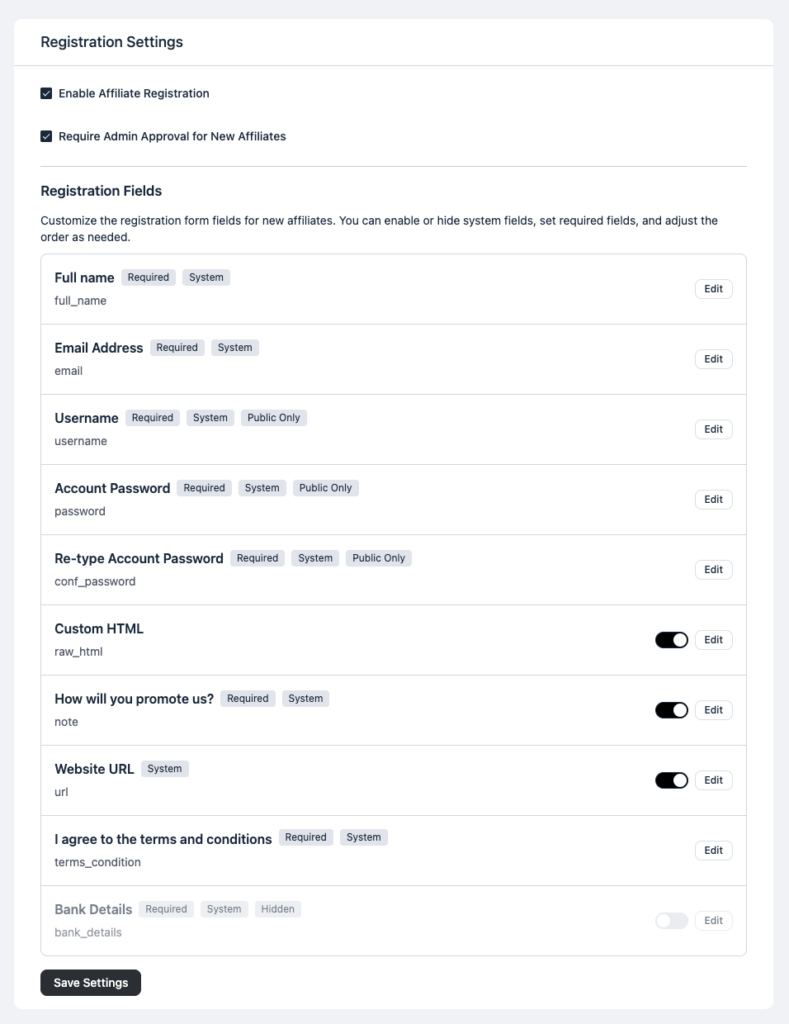
Setting 1: Enable or Disable Registration
The Enable Affiliate Registration toggle is the master switch. When it’s on, your affiliate signup page is live and accepting applications. Turn it off if you want to pause registrations temporarily.
Setting 2: Approval Process
Here’s a big decision: do you want to approve affiliates manually, or let anyone join automatically?
- Manual Approval (Require admin approval): New applicants get a “Pending” status. You review their profile and approve or reject them. This is the safest option if you want to vet your affiliates before they start promoting your brand.
- Automatic Approval: Anyone who fills out the registration form becomes an active affiliate instantly. This is great for growing your program fast without extra admin work.
For most new programs, manual approval is recommended. You can always switch to automatic once you’re more established and trust the incoming applicants.
Setting 3: Customize Registration Form Fields
You can control exactly what information affiliates fill out when they sign up.
For each field, you can:
- Toggle it on or off (show or hide it on the form)
- Edit the label, placeholder text, and whether it’s required
Common fields include Full Name, Email Address, Username, Website URL, How Will You Promote Us, and Payment Email.
Click Save Settings when done.
Step 5: Connect Your Store or Plugin (Integration)
This is where FluentAffiliate really earns its keep. You need to connect it to whatever platform you’re using to sell so that when a sale happens, FluentAffiliate automatically creates a referral and calculates the commission.
Go to FluentAffiliate → Settings → Integration Settings.
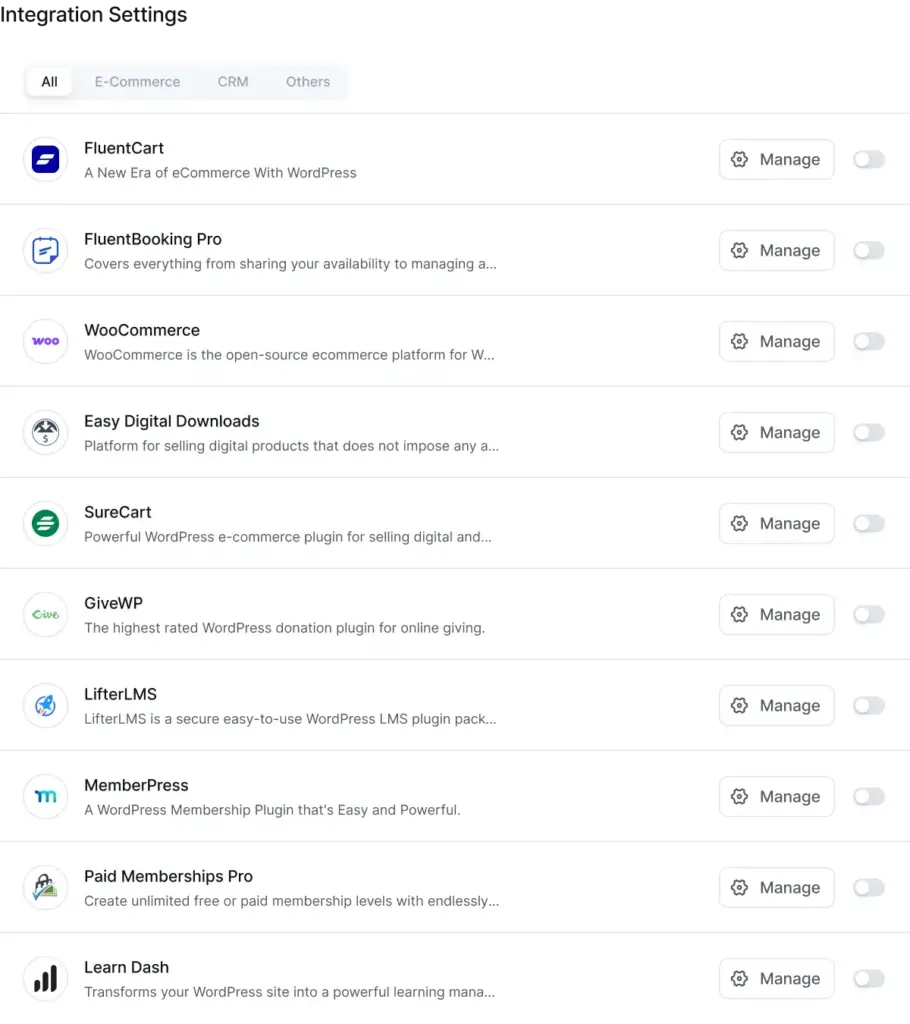
You’ll see a list of available integrations. Here’s a quick overview of what’s supported:
E-Commerce:
- WooCommerce
- Easy Digital Downloads
- SureCart
- FluentCart
- EasyCart
Membership and Courses:
- MemberPress
- Paid Memberships Pro
- LifterLMS
- TutorLMS
- ProfilePress
Forms and Payments:
- Fluent Forms
- Formidable
- GiveWP
- Paymattic
Bookings and CRM:
- FluentBooking
- FluentCRM
To enable any integration, simply click the toggle next to it. Then click Manage to set integration-specific options.
You might want to explore all the available integrations of FluentAffiliate
Setting Custom Commission Rates Per Product
Most integrations support product-level commission overrides. For example, in FluentCart:
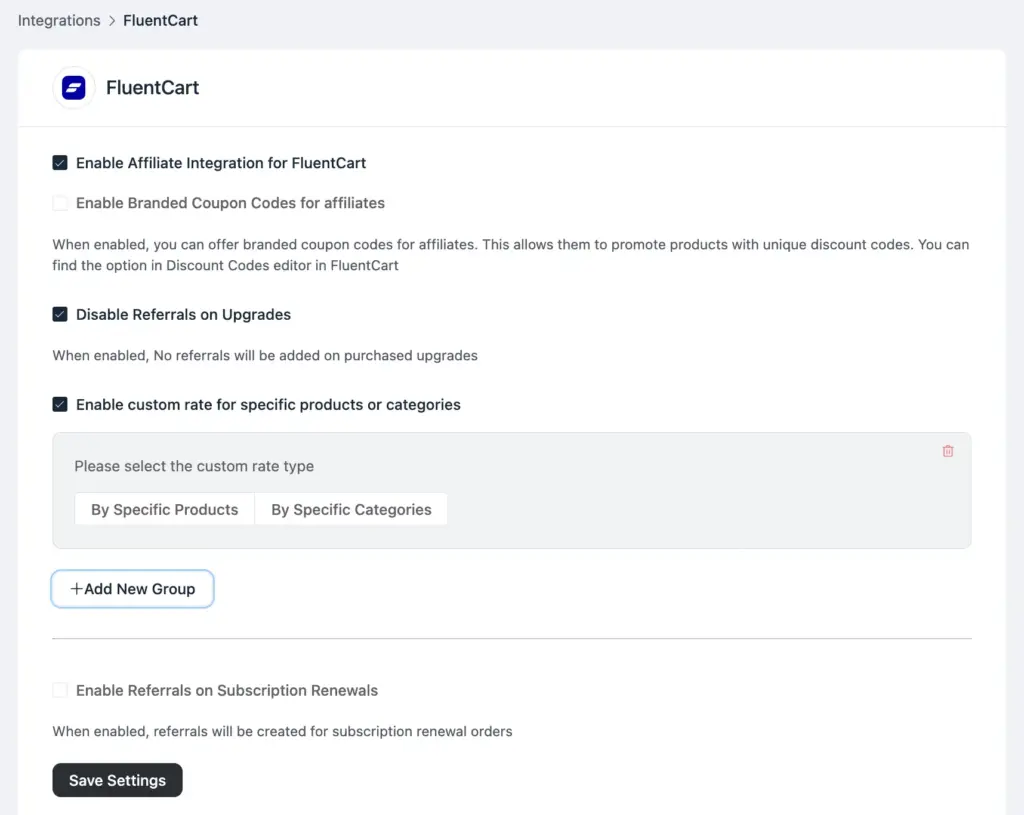
- Toggle FluentCart on and click Manage.
- Check Enable custom rate for specific products or categories.
- Click + Add New Group.
- Search for and select the product or category.
- Enter the commission rate and choose Percentage or Fixed.
- Click Save Settings.
This way, you can offer 30% on your premium product and 10% on your entry-level one, without touching the global default.
Step 6: Configure Affiliate Groups (Optional)
Affiliate groups let you create commission tiers. Think of it like a VIP system — your top performers get a higher rate automatically.
Go to FluentAffiliate → Settings → Affiliate Groups.

Click Add New Group and fill in:
- Name: Something like “Silver Partners” or “VIP Affiliates”
- Rate Type: Flat or Percentage
- Rate: The commission amount for this group
- Status: Active or Inactive
- Note: Optional internal note
Once you create a group, you can assign any affiliate to it from their profile. Their commission rate will automatically update to match the group.
This is a great way to reward loyal affiliates and incentivize new ones to perform better.
Step 7: Set Up Email Notifications
Your affiliates need to know when they’ve earned a commission. And you need to know when a new affiliate signs up. FluentAffiliate handles this with its built-in email notification system.
Go to FluentAffiliate → Settings → Email Notifications → Notification Settings.
You’ll see a list of automated emails, including:
- New Affiliate Signup Notification (to admin)
- Affiliate Application Approved (to affiliate)
- New Sale Notification (to admin)
- New Sale Notification (to affiliate)
- Affiliate Payout Notification (to affiliate)
For each one, you can toggle it on or off and customize the email subject and body.
To customize an email, click the pencil icon. You can:
- Write a custom subject line
- Use the default template or write a fully custom email body
- Insert dynamic SmartCodes like {{affiliate_name}} or {{referral_amount}} to personalize the message
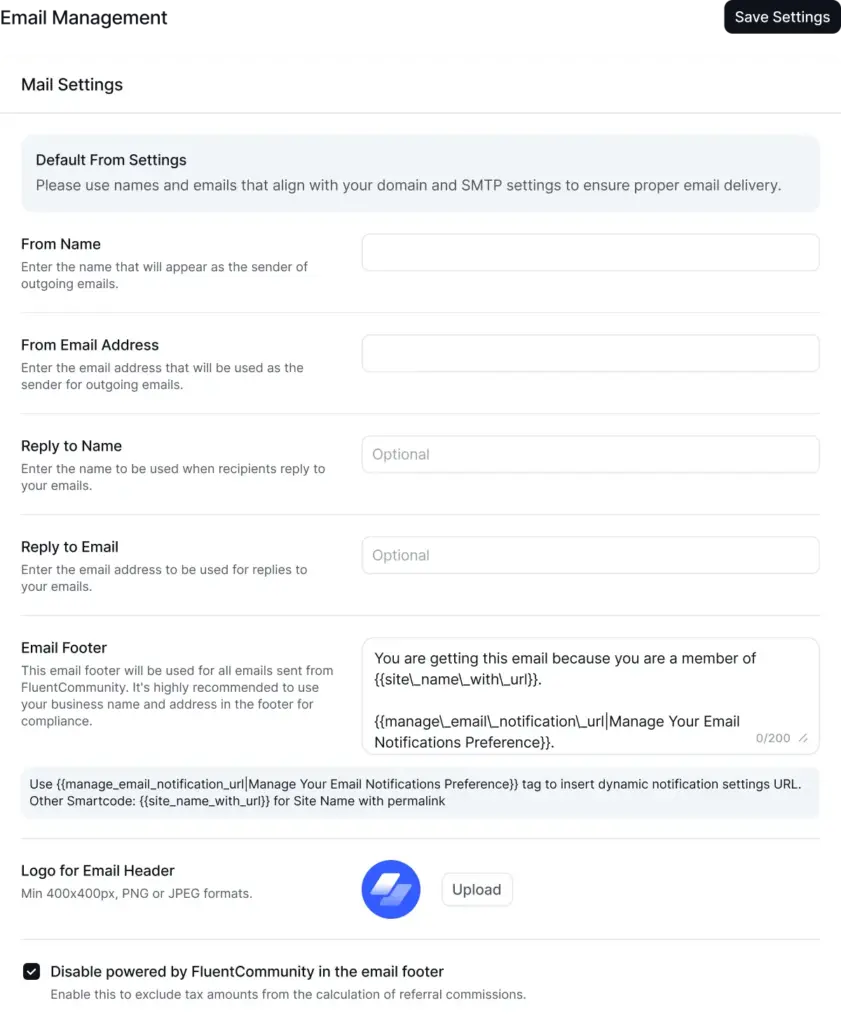
For the email branding, go to FluentAffiliate → Settings → Email Settings. Here you can:
- Set your sender name and email address
- Upload your logo for the email header
- Customize the footer text
- Disable the “Powered by FluentAffiliate” footer text
Click Save Settings when done.
Step 8: Manually Add Your First Affiliates (Or Let Them Sign Up)
At this point, your affiliate program is live. Now you need affiliates.
There are two ways to get them:
Option A: Let Affiliates Register Themselves
Share the URL of your affiliate portal page (the one you created in Step 2). Anyone who visits it can click Register and fill out the signup form.
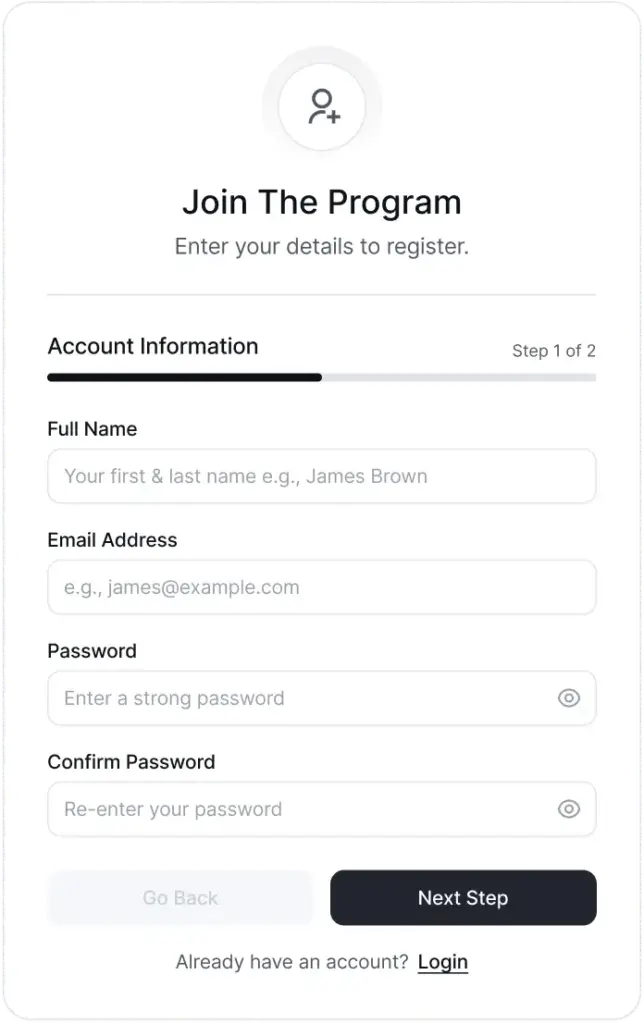
Once they submit, they’ll appear in your Affiliates list with a “Pending” status (if you enabled manual approval). You can review and approve them from there.
Option B: Manually Add an Affiliate
If you already know who you want to bring on as an affiliate — say, a loyal customer or a content creator in your niche — you can add them directly.
Go to FluentAffiliate → Affiliates and click + New Affiliate.
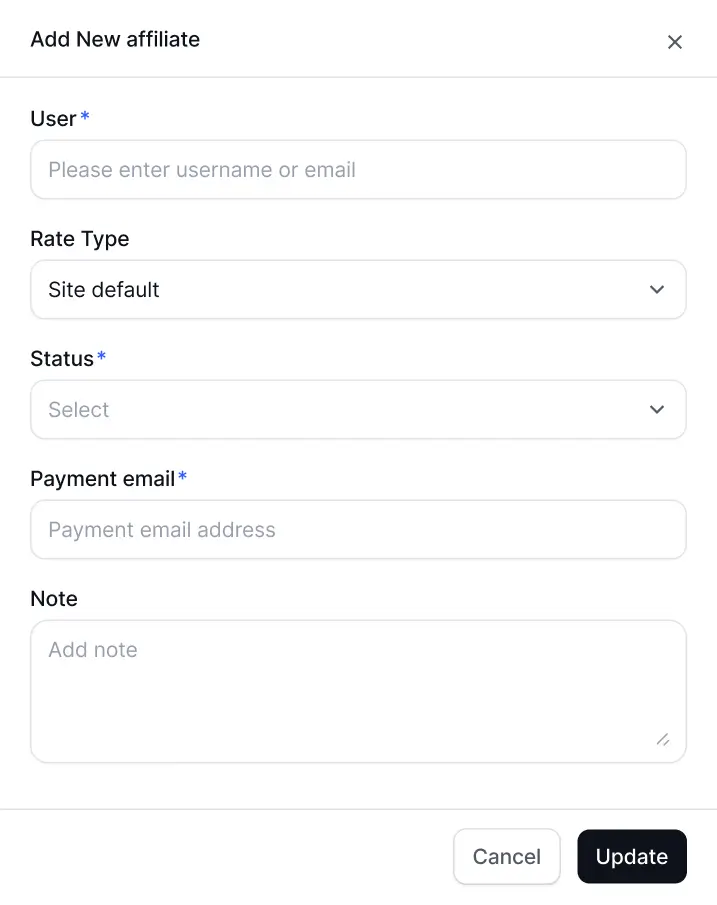
A form slides in from the right. Fill in:
- Select User: Choose an existing WordPress user on your site
- Rate Type: Fixed or Percentage
- Status: Set to Approved if you want them active immediately
- Payment Email: Their PayPal email for payouts
- Note: Any internal notes
Click Create Affiliate, and they’re in.
Step 9: Manage and Track Referrals
Once affiliates start sharing their links, referrals will start rolling in. Here’s where you monitor everything.
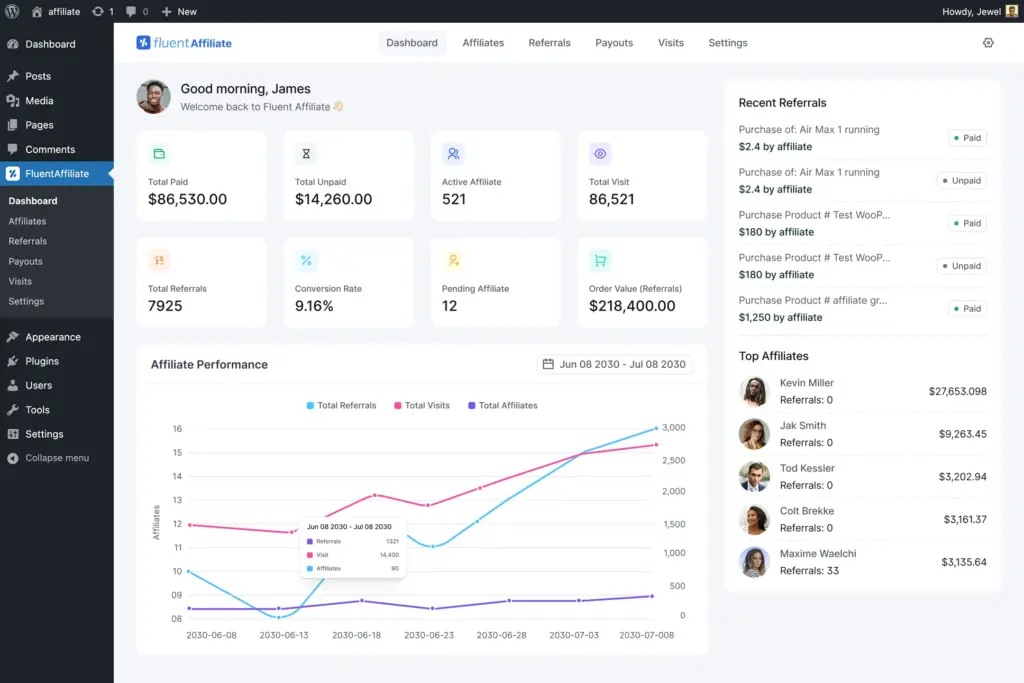
The Admin Dashboard
Go to FluentAffiliate from your WordPress sidebar. The main dashboard shows you:
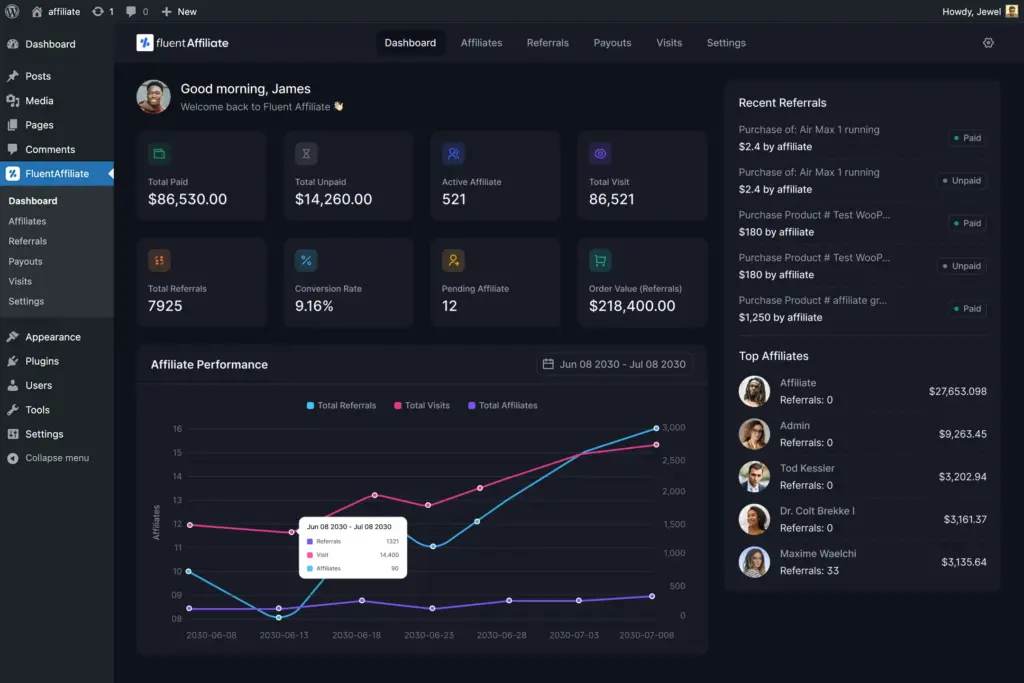
- Total Paid and Total Unpaid commissions
- Active Affiliates count
- Total Visits and Total Referrals
- Conversion Rate
- A growth chart showing referrals, visits, and new affiliates over time
- Recent referrals and your top affiliate leaderboard
The Referrals Page
Go to FluentAffiliate → Referrals to see every single referral that’s ever been recorded. You can filter by status:
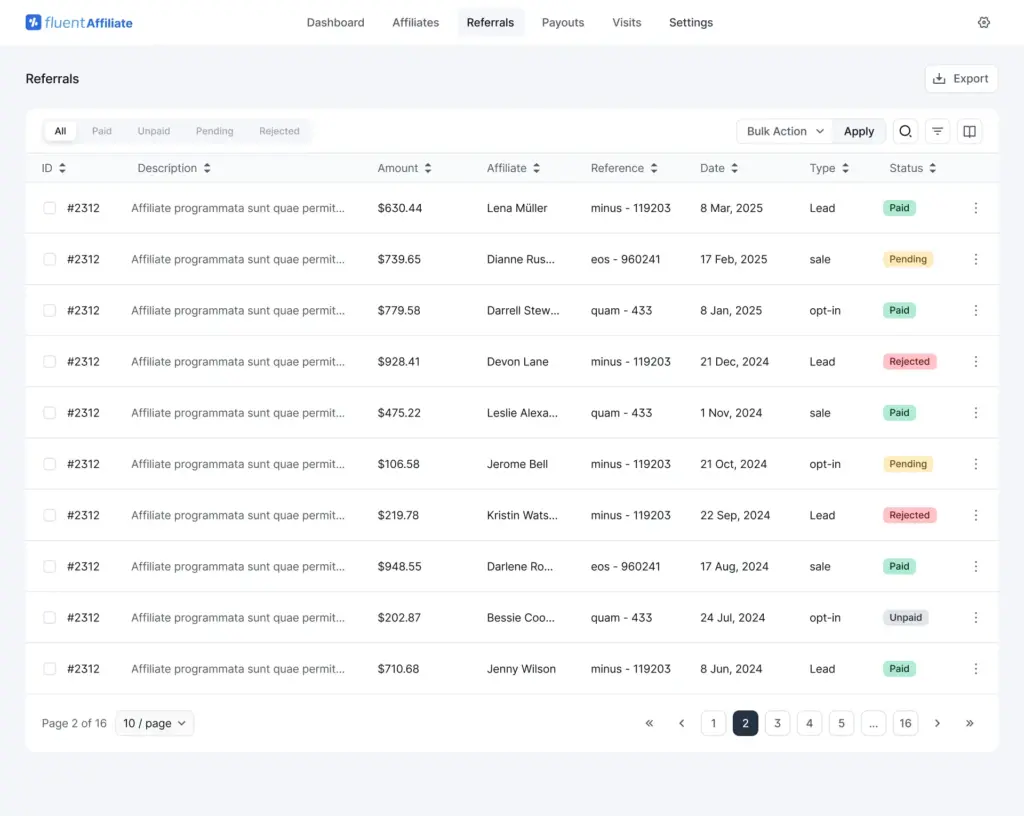
- All: every referral ever
- Unpaid: approved, waiting for payout
- Paid: already paid out
- Pending: awaiting your approval
- Rejected: marked as rejected
You can also manually add referrals for offline sales or special cases using the + New Referral button.
The Visits Page
Go to FluentAffiliate → Visits to see every click your affiliates are generating. The table shows:
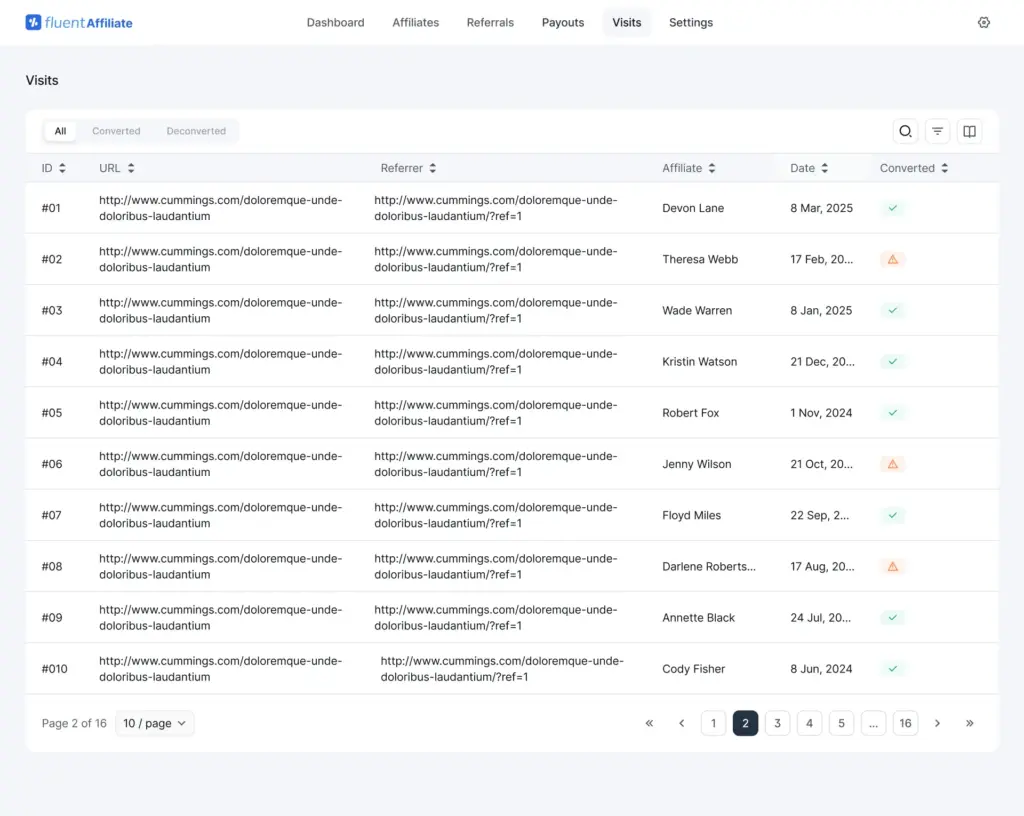
- The destination URL that was clicked
- The referrer (where the click came from)
- Whether the visit converted into a sale
- UTM campaign, medium, and source data (for advanced tracking)
This is incredibly useful for understanding which affiliates are driving quality traffic versus just raw clicks.
Step 10: Process Payouts
This is the part your affiliates are most excited about. FluentAffiliate doesn’t process payments automatically through a gateway — instead, it records what each affiliate is owed and generates a detailed report so you can pay them manually (via PayPal or bank transfer).
Go to FluentAffiliate → Payout and click Pay Affiliate.
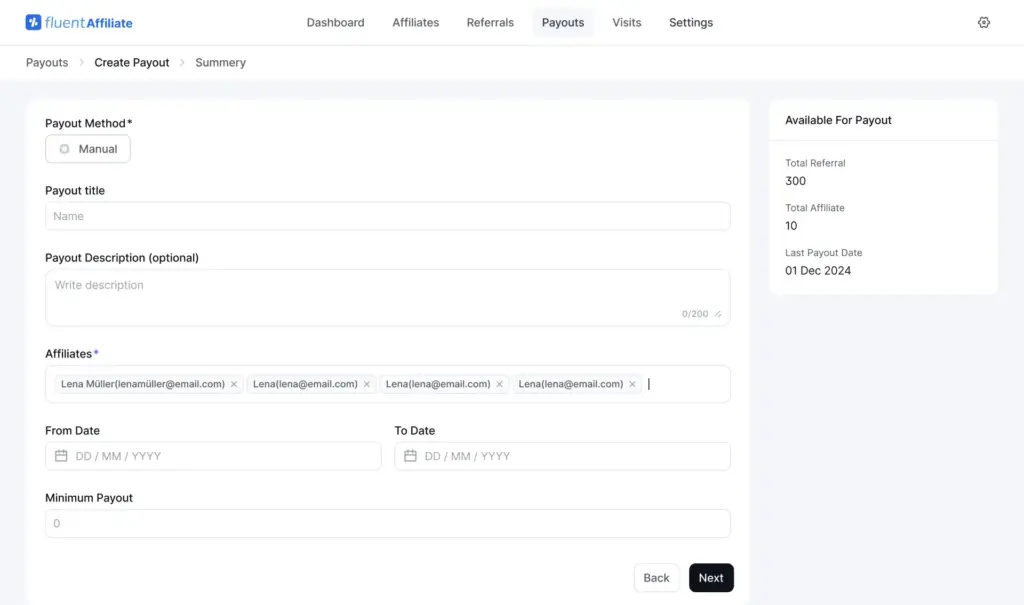
Fill in:
- Payout Title: Something descriptive like “May 2025 Commission Payout”
- Affiliates: Leave blank to pay everyone with unpaid earnings, or select specific affiliates
- Start Date and End Date: The date range for commissions to include
- Minimum Payout Amount: Set a minimum threshold if you don’t want to process tiny amounts
Click Next (Review Payout) to preview the payout details, then confirm.
Once created, you can click into any payout to see exactly which affiliates were paid, how much, and when. You can also export a CSV report from the Transactions tab; perfect for your accounting records.
The CSV export includes affiliate ID, name, email, payout email, amount, and currency, everything you need to process payments through PayPal’s Mass Pay feature or a bank transfer tool.
Your Affiliates’ Experience: What They See
It’s worth taking a moment to look at this from your affiliate’s perspective, because their experience directly affects how well they promote your business.
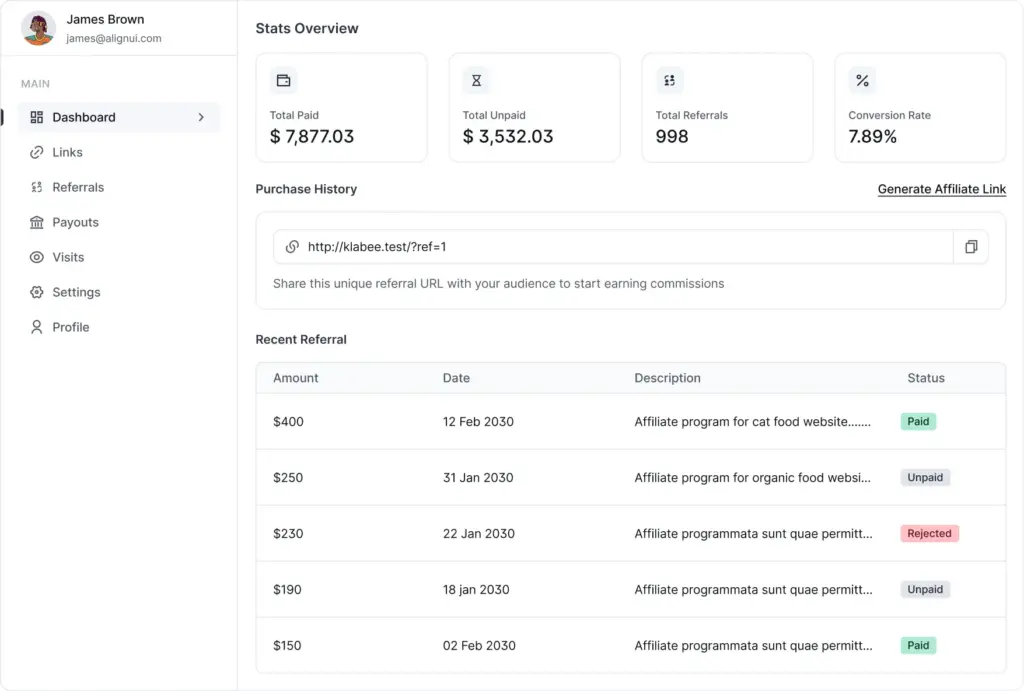
When an affiliate logs into the portal, they land on a clean dashboard showing:
- Total Paid: commissions they’ve already received
- Total Unpaid: approved earnings waiting for payout
- Total Referrals: successful conversions they’ve driven
- Conversion Rate: what percentage of their clicks led to a sale
From the Links tab, they can paste any URL on your site and instantly generate their unique affiliate link. They also get a QR code they can download and use on printed materials.
The Referrals tab shows a full history of every commission they’ve earned, with the date, amount, status, and product description.
The Payouts tab shows their payment history.
The Visits tab shows every click they’ve generated.
And from Settings, they can update their PayPal email and toggle email notifications on or off.
It’s clean, informative, and everything an affiliate needs to stay motivated and active.
Start Your Own Affiliate Program Today!
Best Practices to Make Your Affiliate Program a Success
Setting up the program is just the beginning. Here are some practical tips to actually make it work:
1. Start with your existing customers.
Your happiest customers are your best potential affiliates. Send them a personal email inviting them to join. They already love your product, they just need a reason to talk about it.
2. Set a commission rate that’s motivating.
Too low and affiliates won’t bother. Too high and you eat into your margins. As a rough benchmark, 20–30% is standard for digital products. For physical products with thinner margins, 5–15% is more common.
3. Create resources your affiliates actually want.
Banners, email templates, social media copy, and product FAQs make it much easier for affiliates to promote effectively. Use the Affiliate Creatives feature in FluentAffiliate to upload and organize these.
4. Communicate regularly.
Send a monthly update with your top performers, any new products launching, and seasonal promotions they can use. Affiliates who feel connected to your brand perform better.
5. Reward your top performers.
Use Affiliate Groups to move your best affiliates into a higher commission tier. Even a small bump, say from 20% to 25%, can be a powerful motivator to keep pushing.
6. Watch your conversion data
The Visits page in FluentAffiliate shows you which affiliate links are converting and which aren’t. Use that data to help underperforming affiliates improve their approach.
Wrapping Up
Setting up an affiliate program on WordPress doesn’t have to be complicated or expensive. With FluentAffiliate, you get a complete affiliate management system built right into your WordPress dashboard: no third-party platforms, no complicated APIs, no steep learning curve.
Here’s a quick recap of what you’ve done in this guide:
- Installed and activated FluentAffiliate
- Ran the onboarding wizard to set basic commission rules
- Configured detailed referral and registration settings
- Connected your store or plugin via integrations
- Set up commission tiers with affiliate groups
- Configured email notifications
- Added affiliates and started tracking referrals
- Processed your first payout
- Set up creatives and custom landing pages for affiliates
That’s a fully operational affiliate program: live on your WordPress site.
If you haven’t already, download FluentAffiliate for free and start building your affiliate army today. And if you’re ready for the full power of Pro integrations, check out FluentAffiliate Pro to see what’s waiting for you.
Your next sale might just come from someone you’ve never even met.


Leave a Reply